
Whether you’re starting fresh with Contentful or migrating from a traditional CMS, organizations today need a flexible, efficient way to create and manage content. 84% of US enterprises say information silos hurt productivity. Contentful’s headless CMS (content management system) breaks those silos, helping teams work more efficiently whether starting fresh or migrating from a traditional CMS.
This guide demystifies the setup process, explains key concepts, and outlines foundational best practices for a smooth implementation. We’ll take you through a step-by-step process of how Contentful works—from defining your content model to delivering rich, responsive experiences across multiple platforms. You can get an idea of the core content management best practices to help you implement Contentful with confidence.
Why Contentful?
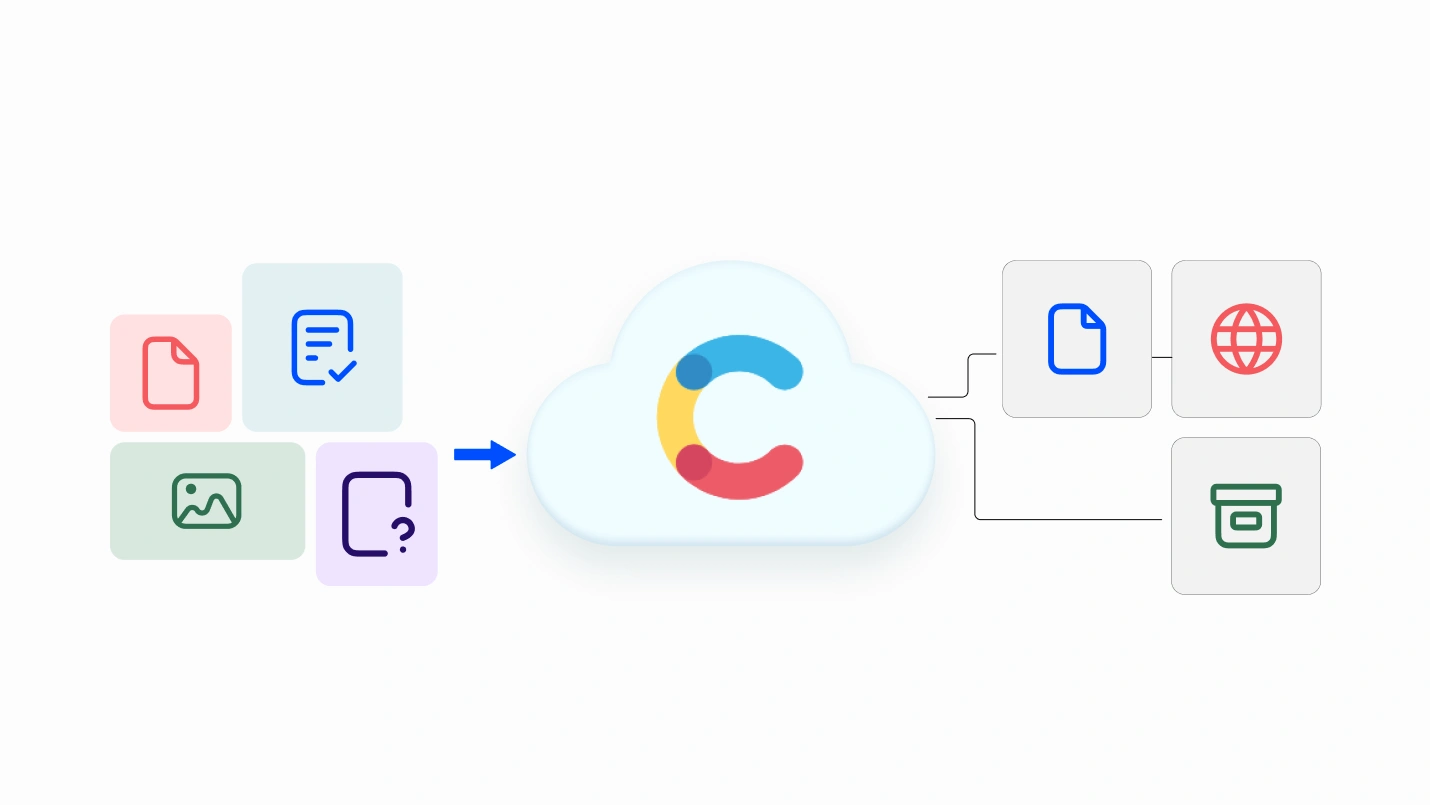
Contentful’s headless approach decouples content from presentation, allowing the same article or product specification to feed any channel without requiring reauthoring. This future-proofs your stack; when a new device or channel appears, you connect an API (application programming interface) instead of rebuilding your CMS.
Key Benefits of Following the Best Practices of the Contentful Content Model:
- Streamlined content operations
- Consistent, scalable models
- Faster time-to-market
- Improved collaboration
Additional Benefits of Contentful:
- Flexibility & Customization: Tailor content models and workflows to your business needs.
- Scalability: Manage increasing content volumes and traffic with ease.
- Multi-Channel Delivery: Publish once, distribute everywhere.
- Collaboration: Unite marketers and developers under one roof.
- API-First: Integrate seamlessly into your existing stack.
- Speed & Reliability: Leverage global CDNs and powerful APIs.
Establishing proven approaches early helps organizations in industries like eCommerce, SaaS, AI Retail, Healthtech, Fintech, and Edtech focus on delivering compelling customer experiences rather than fixing structural issues later.
Understanding the Core Terminology for Contentful
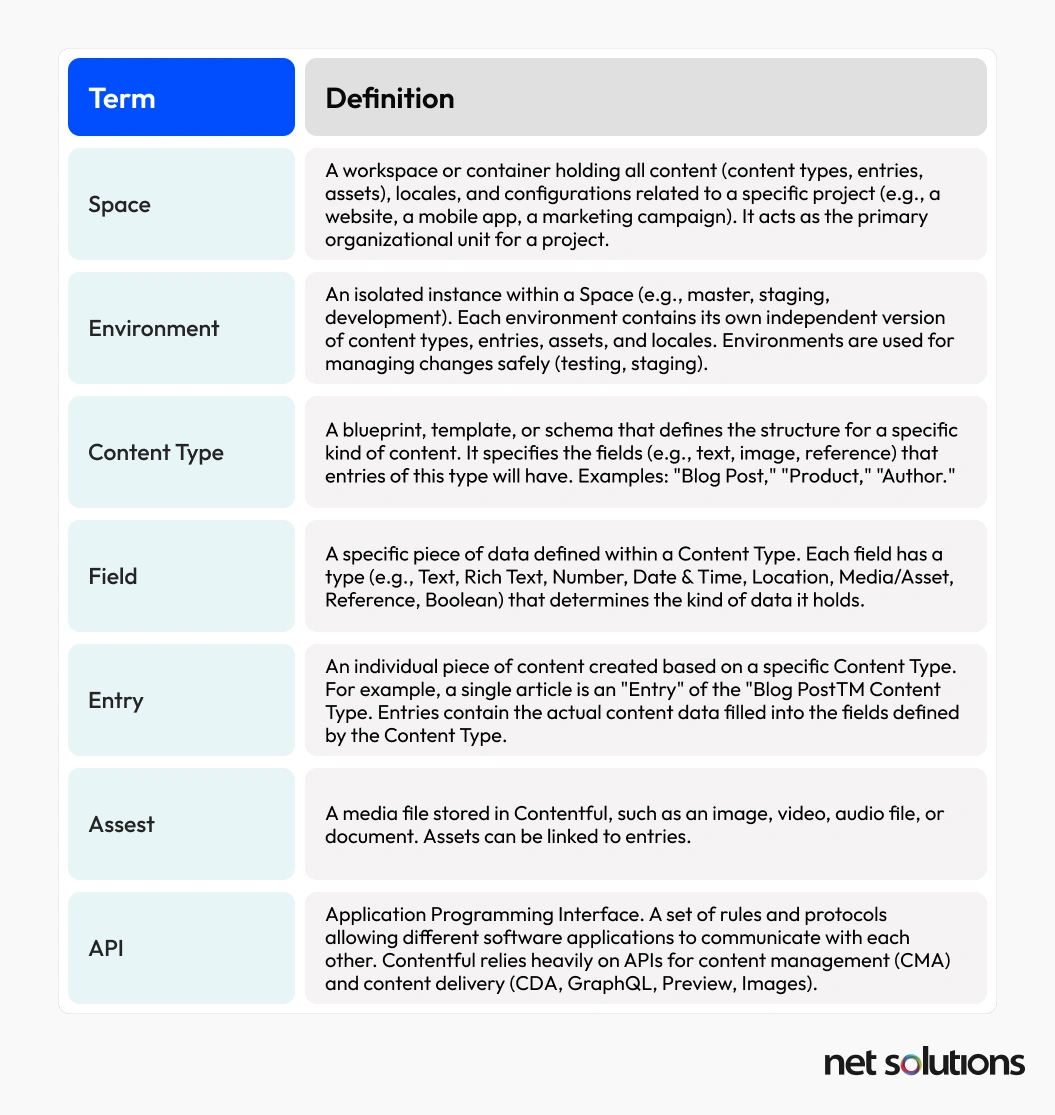
Understanding Contentful’s core terminology is essential for navigating the platform effectively. A misunderstanding of basic objects—“Space” versus “Environment,” for example—causes avoidable permissions issues and migration re-work later on, especially as projects scale. Contentful organizes content into a hierarchy of objects, each serving a distinct purpose.
A Space functions as the overarching container for all content, assets, and configuration tied to a specific project, such as a website or mobile app. Within a Space, Environments provide isolated instances (e.g., production, staging, development) that allow teams to experiment or test changes without affecting live content. The following table can explain more specifically:
Understanding how all of the above interrelate ensures efficient collaboration, smooth migrations, and a scalable content architecture for your team from the start.
How Do You Implement the Contentful Content Model?
You can incorporate Contentful from scratch or migrate from a legacy CMS, such as WordPress, Drupal, or Sitecore. Both scenarios require thoughtful planning, but migration to Contentful CMS needs an added layer of auditing and transformation.
For Migration Projects, Start With:
- Audit: Decide what to migrate, archive, or refresh.
- Map schemas: Align legacy content types to Contentful models.
- Choose migration path:
- Bulk import (CSV/JSON/CLI)
- Use CMA (REST/GraphQL)
- Third-party ETL for complex cases
- Ensure:
- Thorough testing and rollback plans
- Change management for smooth adoption
After migration (or in a fresh setup), follow the steps below to configure your Contentful environment.
Step 1: Setting Up Your Space & Content Model
A solid Space architecture and a disciplined content model form the backbone of every successful Contentful implementation. Invest the effort here, and you’ll feel the benefits in faster releases, clearer governance, and happier editors down the road.
A. Creating (or Selecting) a Space
In Contentful, a Space is a self-contained repository that holds all content types, entries, assets, locales, roles, and API keys for one initiative. Treat it as the “database” for a single product, brand, or major project.
If you’re running a single-brand website or mobile app and the same editorial team owns all content, one Space will usually do the trick. You can still create multiple Environments inside it—such as development, staging, and production—to keep unfinished work away from live content.
When to create multiple Spaces:
Spin up additional Spaces when you need strict separation:
- Multiple brands or regions
- Different security requirements
- Parallel migration streams
B. Defining Your Content Model
A well-designed content model prevents duplication, enforces consistency, and keeps delivery teams nimble.
- Start with the core nouns your product relies on—Blog Post, Author, Product, FAQ.
- Choose the right fields—Short Text for slugs, Rich Text for long copy, Media for assets, References for linking.
- Model relationships. Break large pages into reusable building blocks and reference them.
- Choose the right field types. Short Text for slugs, Rich Text for long-form copy, Media for assets, References for links between entries. Proper typing prevents garbage-in, garbage-out.
- Validate at the point of entry. Length limits, required flags, or regex patterns catch errors before they accumulate into broken pages.
- Iterate. Review the model with both developers and editors every sprint or two. Small, intentional changes hurt a lot less than an annual refactor.
Step 2: Creating & Managing Content
Contentful optimization features serve as strategic levers for aligning marketing and engineering. Now that your Space and content model is ready, the next step is filling it with real words, images, and language variants.
Creating Entries
An entry is just a filled-in version of a content type, like completing a form. Because rules and fields are already set, editors focus on writing, not structure. Build pages from reusable blocks (hero image, call-to-action, quote) so the same pieces can power future campaigns.
Managing Media Assets
Give files plain-language names (for example, “summer-hero-en.webp”) and tag them by campaign or product. Keep one master copy in Contentful and let the platform resize or reformat it on the fly, so you never juggle multiple versions or break links.
Localization
Add every language you need—say, English (US), German, and Japanese—before content creation starts. Each entry then stores its translations without duplication. Connect a translation service to move drafts smoothly from “needs translation” to “ready to publish.”
Step 3: Establishing Workflow Management
Contentful’s premium Workflows app turns ad-hoc hand-offs into a repeatable pipeline.
- Create a flow with the usual steps — Draft → Review → Publish (add “Legal” or “Localization” if needed).
- Each Space can hold up to 10 workflows, and each workflow is limited to 20 steps, so keep stages lean and purposeful.
- Use role-based permissions so only the right people can move an entry forward: authors draft, editors review, publishers push live. Clear ownership means faster approvals and airtight accountability.
Step 4: Collaboration & Automation
In the 2024 Workplace Communication Statistics report, 63% of employees say at least half their coworkers lack adequate communication skills — costing them 3.2 hours each week just deciphering badly written or unclear messages from colleagues.
Contentful’s content model with tasks and notifications helps reclaim that time by assigning clear roles, using a simple RACI (Responsible, Accountable, Consulted, Informed) model, and automating alerts via email or Slack to keep everyone aligned.
Contentful Workflows display clear entry status (Draft → Review → Publish). Form small cross-functional pods to shorten feedback loops, shift reviews to async with inline comments, and track draft-to-publish cycle time to catch bottlenecks early.
You can also automate hand-offs and publishing with webhooks. Trigger static-site rebuilds, send entries to translation tools, or sync assets with DAM systems. Integrations reduce manual steps, keeping your content pipeline flowing smoothly.
Step 5: Integrating the Front End
Contentful’s headless architecture gives you total freedom in how you build your frontend. However, integration requires a few deliberate steps to ensure security, performance, and editorial efficiency.
1. Select a Presentation Layer
Pick a framework suited to your goals—Next.js, Nuxt, Astro, native apps, or IoT devices—considering team expertise and performance requirements.
2. Decide How to Consume Contentful Data
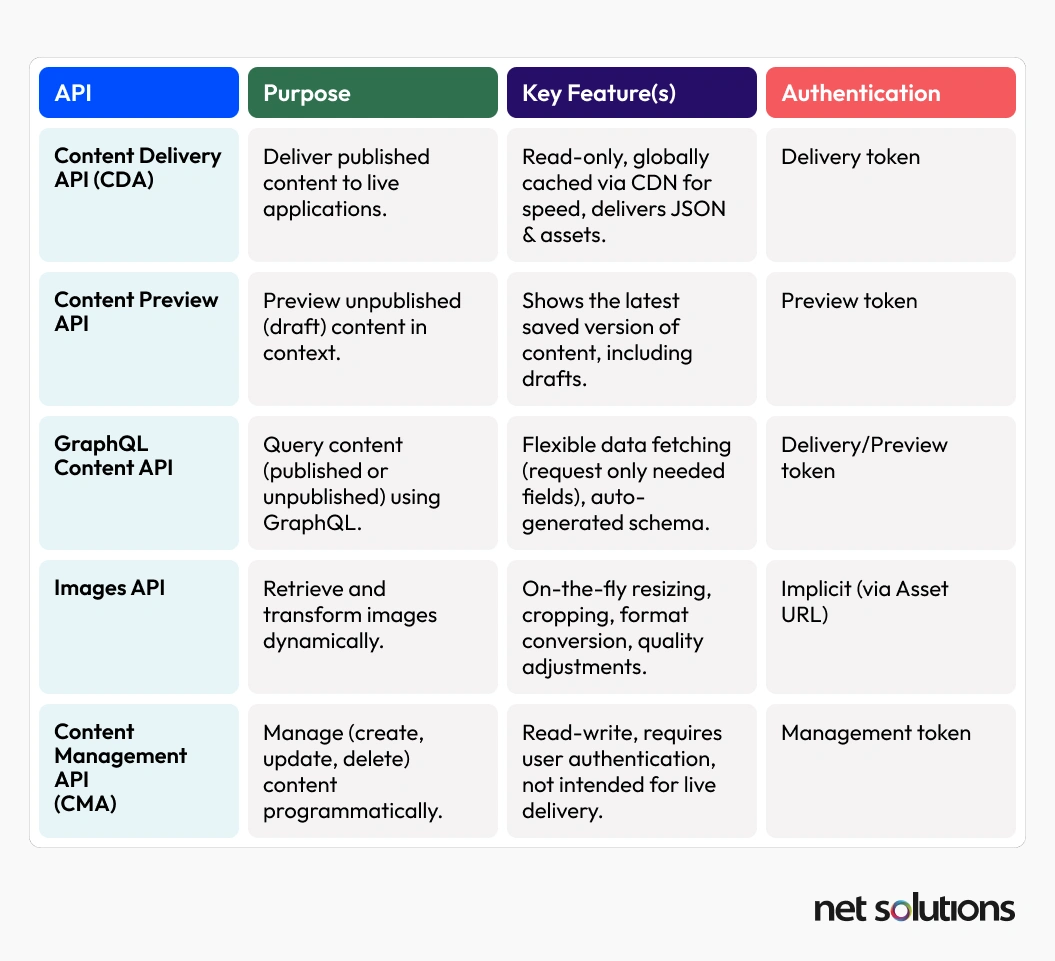
Retrieve content via REST or GraphQL using the Content Delivery or Preview APIs. GraphQL enables querying only the required fields, reducing payload size.
- REST: Simple and widely supported
- GraphQL: Efficient and precise queries
3. Configure Authentication and Environment Management
Use Environment Tokens to separate staging and production securely; avoid exposing tokens in client-side code and rotate them regularly.
4. Set Up Preview vs. Published Workflows
Integrate the Preview API so editors can review drafts without affecting live content.
5. Optimize Rendering and Performance
Leverage:
- SSR (Server-Side Rendering)
- ISR (Incremental Static Regeneration)
- Edge rendering and caching for speed
You can decide the rendering based on content needs, and pair it with caching to improve speed and reduce API calls.
Step 6: Content Delivery
Delivering content quickly and reliably to every channel is almost the final step in building a great experience.
1. Use APIs
Contentful’s Delivery and Preview APIs let you serve the latest content to any channel—websites, apps, kiosks, or IoT devices.
- REST: Easy to use and well-supported
- GraphQL: Allows more efficient, tailored queries to reduce load times
2. CDNs for Performance
A CDN (Content Delivery Network) caches your content—like images, JSON, and HTML—on servers around the world. The CDNs serve content from locations closer to users, significantly reducing latency and improving load times. This ensures a fast, consistent experience even at scale.
You can use Contentful’s CDN to serve content globally with low latency, making it easier to deliver engaging and reliable digital experiences to users wherever they are.
Step 7: Monitoring and Optimization
Monitoring content performance is essential. Use analytics to track engagement and conversions, refine your strategy, and streamline workflows.
Studies show that costs rise by up to 60% when teams rely on manual fixes over proactive design—highlighting why optimization and governance are critical for long-term efficiency.
Step 8: Integrations & Extensibility
Contentful’s API-first design makes it easy to extend your CMS to match your evolving needs.
- Integrations: Connect tools like Bynder for streamlined asset management, plus other key systems such as eCommerce platforms (Shopify, BigCommerce), analytics tools, CRM, marketing automation, translation services (e.g., Smartling), or search platforms like Algolia—for integrated, scalable content workflows.
- Template Mapping: Maintain consistency across channels by defining and reusing structured templates that work for web, mobile, email, and more.
- Approach for future: A headless, API-first CMS like Contentful gives you the flexibility to adopt new technologies, channels, and integrations over time without re-architecting your entire content stack.
When you invest in flexible integrations and well-structured templates today, you ensure your content operations stay scalable and ready for whatever channels or technologies tomorrow brings.
Conclusion and Next Steps
Contentful’s headless approach future-proofs your strategy by decoupling content from presentation. Having a solid model, clear workflows, and API-driven delivery, your team can collaborate effectively and ship faster. You’ll be ready to scale digital experiences, integrate new technologies, and adapt to changing business needs. Contentful’s robust editorial interface and rich ecosystem of integrations make it easy to adopt and extend. With this Contentful CMS guide, you’re ready to put theory into practice!
Ready to Take the Next Step?
Download From Decision to Deployment: Contentful Implementation Checklist and start building smarter today. The practical steps we provide will ensure a smooth, efficient, and successful implementation, along with streamlined content creation.